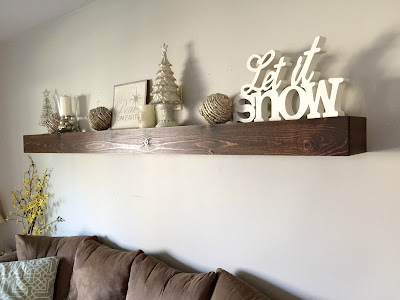
I have another cheap, easy and beautiful DIY project to share with you!
Our living room wall was driving me nuts. I couldn't find anything I liked for that wall. . .
UNTIL NOW!!!
The floating shelf is absolutely amazing.
It's definitely the focal point of the living room, and it's a perfect spot to showcase seasonal decor!!
This project took about 1/2 a day. That includes ripping the boards, assembling everything, staining and bringing it inside to hang! It was so much easier than I expected.
I'll explain how we assembled ours, the exact measurements we used, and the stain color.
So if you're interested,
in 3 simple steps, here you go:
First, here are the supplies you'll need:
Drill
2 1/2" deck screws
3 1/2" wood screws
1 1/2" hardwood trim nails
(3) 1x8x8 pine boards for "box"
2x4's for "support"
Stain & poly finish if you choose
Level (if you want a straight shelf...)
Stud-finder
First, here are the supplies you'll need:
Drill
2 1/2" deck screws
3 1/2" wood screws
1 1/2" hardwood trim nails
(3) 1x8x8 pine boards for "box"
2x4's for "support"
Stain & poly finish if you choose
Level (if you want a straight shelf...)
Stud-finder
STEP 1: Assemble & attach your "support"
We used 2x4s for our inner support frame.
I wanted the shelf to be the entire length of our couch, so we made our inner support 86-1/2" long.
We used 6 supports (aka, "stubs"), each being 5-3/4".
(PREDRILL the holes in your main 2x4, to which you'll attach your stubs)
Then, using 2-1/2 inch deck screws, we attached the stubs to the main 2x4 piece.
Once our support frame was done, we used a stud-finder to locate all of the studs we could use to drill our frame to. We made a small mark on the wall where each stud was located.
Then, we used a level to get our frame in place, and using 3-1/2" wood screws, we attached our frame to the wall. We used 2 screws for each stud.
STEP 2: Assemble The "Box"
We chose to use 1-1/2" hardwood trim nails and a hammer to assemble the box.
You could use a nail gun or screws, but for us this was easiest, and we knew (from previous projects) that the nails would not show with the color of stain we would be using.
As you can see in the picture below, our top and bottom boards were both 86-1/2"x7-1/4".
Our end pieces were both 7-1/4"x5".
Last, we attached the front face board, which was 88"x5".
Depending on the look you're going for, or what wood you use, you may be ready to assemble your shelf at this point! I chose to stain mine a nice, dark walnut color. I used Rustoleum's Dark Walnut stain. I applied it with a brush, let it sit for 2-3 minutes, then wiped away the excess stain with an old cut up t-shirt.
 |
| Once Aaron was done helping me assemble the box, he worked on his Katniss skills while I worked on the staining. |
STEP 3: Hang Your Beautiful Shelf!
As you have probably guessed, this was the easiest step!
Once your box is dry, and poly-ed (if you choose to...which I did) take your box and slide it onto your support!
Using screws, attach the box to the support through the top board (that way your screws should be hidden).
VOILA!
 |
| Again... Harley the photobomber. |


Love!!!!
ReplyDelete