Slide Show

Showing posts with label DIY. Show all posts

Jaxon's Nursery

Boy nursery name above crib


DIY Giant Magnetic Chalkboard

DIY Giant Magnetic Framed Chalkboard

I have been DYING to do this project!

I've seen so many cool, BIG chalkboards.
Some people have them painted right onto their walls, which I considered doing, but our walls are pretty textured, and I didn't want to sand them down, because, well then that's a non-textured, chalkboard chunk of wall forever... unless you repaint, retexture... and you get the picture.

I wanted a giant chalkboard I could move if I wanted, and I wanted it to be magnetic.
So... since I didn't find any tutorials with what I wanted...
I do like I normally do, and come up with my own little plan for exactly what I want.

This time, it was a 3'x5' magnetic chalkboard, made out of galvanized sheet metal.
I had plenty of sheet metal at my disposal, since my dad owns a heating and cooling business.

So here's exactly how I pulled this little big project together:

I started by picking the size: 3'x5'.

So I got my sheet metal, cut it to size, and folded all the edges in/under 1/2", to provide stability. Otherwise this thin sheet metal will wobble and kink, and once you get a kink or wrinkle in it, there's no getting that out. Folding the edges doesn't totally fix this possible problem, so you still need to be careful when handling the sheet metal, but it does help a lot with strengthening the sheet.

Then it was time to paint! (I used Rust-Oleum's chalkboard paint)
I did 3 coats of chalkboard paint, following the dry times between coats.

For the frame I used 1x4 pine boards.
I love using pine for accent pieces, I used pine for my DIY Floating Shelf too. I just love the character it has, with the knots and the grain of the wood. You also can't beat the price.
I wanted the top and bottom boards to overlap a little, as you can see.
You can really frame your chalkboard however you want.

I stained the pine with 1 coat of Minwax walnut stain, and finished it off with 3 coats of the Minwax poly.

Once my 3rd coat of chalkboard paint was dry on the sheet metal, we got to work on figuring out how to attach this thing to the pine boards!!

We opted on using some super strength glue, as well as 1/2" screws to make sure the sheet metal was secure, and not bendy once up on the wall. So we glued all the edges on the back (unpainted side) of the sheet metal, to the back (unstained side) of the pine boards, then secured it with the 1/2" screws.
(this way all of the screws are hidden, and are on the backside of your frame)
THIS... getting those screws through the metal, was quite a job. Good thing I had my husband Aaron :) This was his job. It was not easy...

In the photo above you can see how we attached the sheet metal/chalkboard onto the backside of the frame.
In this photo above you can see our 1/2" screw into the sheet metal, and the frame.
Once we had the sheet metal all attached to the frame, it was time to screw it onto the wall! We marked where we had studs, and screwed the chalkboard into the studs using deck screws.

If you don't have studs where you're hanging your chalkboard, you will want to use anchors.

The screws we used to hang the chalkboard on the wall were silver, and stood out against the dark stained trim frame. So I used some of my left over Oil Rubbed Bronze Rust-Oleum spray paint, and with a q-tip, just painted the screw heads so they blend in with the dark wood! 

One the chalkboard was all snug to the wall, we were mostly done!!

I let the chalkboard cure for 7 days actually... which normally would have been torture for me to wait so long, but working on the baby's room throughout the week kept me distracted! Check out a sneak peak of his nursery here by the way! 

After the 7 long days of curing, I "primed" the chalkboard.
This just consists of covering your brand new chalkboard in chalk, then rubbing it in with a dry cloth, and then just cleaning it off with a damp rag.
Since chalkboards are porous, if you skip this step, your first few drawings will more than likely end up being pretty much permanent... and you don't want that!
I went through a few pieces of chalk priming my board, since it's a BIG friggin' chalkboard!
BUT THIS IS A "DO NOT SKIP" STEP!!

Once I had it all covered, I rubbed the chalk in good with a dry, clean cloth, then just wiped it all off with some damp paper towels, and VOILA!!! 

Ready to ROCK & ROLL with this baby! 

I LOVE it! 
I can't wait to get some fun magnets for the kiddos to play with on this chalkboard too!


I also decided to make a cute burlap "play" banner.  
I have a similar burlap banner on my floating shelf that I love, as well as the burlap banner I made last year for Gavin's birthday... tutorial for these banners is here by the way! 
These banners are SO easy to make, it literally took me a total of 15 minutes!
I think it gave the chalkboard its very last, finishing touch!

:)

This chalkboard was a super fun project to do, and it really wasn't all that hard either! 
It's now one of my favorite things about our house!!

DIY Barnwood Towel Hanger

DIY barn wood towel hanger
Comin at ya with a super easy, and cheap DIY project!

I have about 1,000,004 little, crafty, decor projects I want to do in this house...
and this was one of them!

We didn't have any sort of hand towel hanger in our bathroom, which was not going to work for me. 
I couldn't stand leaving our hand towel in a bunched up pile on our countertop any longer!!! 
So today, I finally took the 30 minutes of time it required, and came up with my handy little DIY towel hanger!

So, here's what I did:

Here are the few things you'll need:

The hose clamp you can get from a local hardware store.
The hook/hanger I just got from Target.
The glass bottle I got for a couple of dollars from Michaels.

We have a pile of old barn wood out in our garage, so I went and grabbed a piece. 
Cut it to the size I wanted, and sanded it down... not totally smooth, but basically just getting rid of any splinters and real rough edges.

Next, I figured out exactly where I wanted my towel hook, and the bottle. Once I had that figured out, I screwed my towel hook into the board. 

The hose clamp and the glass bottle are slightly trickier. We used a small screw (1/2" long) to attach the hose clamp to the board. We pre-drilled a small hole into the hose clamp, then by hand, just screwed the 1/2" screw through that hole, and into the board. The hardest part was just getting the hole into the metal hose clamp (all in all, not too tricky). Once the hose clamp was attached to the board, I just tightened the clamp around the top of the bottle, until it was secure.

Then all that's left is to hang it where you want it!

VOILA!


Playroom Makeover

This post is sadly, one that I forgot about until now! (oops!!)
We actually remodeled this room last year, April of 2015.
I've had this saved as a "draft" until now, so I'm finally getting around to adding the finished photos, and sharing it with you!
So here it is:

Before our playroom was a "playroom", it was a room that we never really used.
Aaron did his workouts in this room, but other than that it really had no specific use...as you can see.

Before Photos:


Before
Before... (the carpet that was on the stairs was different than the
original carpet in the playroom- it was just as nasty though.)

After Photos:


Everything We Did:

-Painted trim & doors white
-Painted/updated door hardware
-Painted walls
-Replaced carpet in playroom & on stairs
-Painted stair skirt board white
-New decor & furnishings

Where Is It From:

-We made the storage/entertainment center ourselves
-I made the Scrabble Tile wall art
-All other wall art is from Hobby Lobby
-Kids table is from Ikea- I ordered it off Amazon for just under $50. I stained it a dark walnut color myself.


All Natural Face Wash Challenge- UPDATE!!

Well it's been 1 week since starting my all natural face wash challenge!
A lot changed since my initial post.

I use about 1tsp of coconut oil in the morning to wash my face, and I use the same amount at night to wash my face before bed. I also use it throughout the day (if I need to) as a moisturizer. 
I will admit, I was super nervous about using OIL on my face. I didn't want my skin to be left greasy and oily... and since I have such sensitive skin I was ridiculously nervous that I would be left with angry skin, and bad breakouts. Thankfully, that is NOT the case. The oil absorbs into my skin within minutes, and since I've started this, my skin has been so soft and smooth! I've also noticed my skin is FAR LESS oily! Isn't that odd?! Since using OIL to wash my face, my skin is LESS oily! Awesome how that works! 

When I say I "wash" my face with the coconut oil, I really do just that. I get my face wet with warm water first, then rub about 1 teaspoon of coconut oil in my hands to melt it, and then massage it into my skin for a couple minutes. Then I rinse my face, but there's always a decent amount of oil that stays on my skin. If you're familiar with coconut oil, you know what I mean. I lightly pat-dry my face, and then most of the coconut oil is off, but there's always a decent layer that doesn't rinse or dry off. I let this soak into my skin, it only takes maybe a few minutes. Sometimes if I notice my skin really absorbing the oil fast, I'll add a tiny bit more, just so my skin feels more moisturized. I do this morning and night, and it's all I do now. I will occasionally use a drop of tea tree oil in my moisturizing coconut oil at night, right before bed, but I don't even feel like it's something I need anymore!

I originally planned on using a combination of baking soda and coconut oil a few times a week as more of a deep clean cleanser- after doing it once, I realized it dried out my skin A LOT. It really left my skin feeling SO clean, and smooth, but the next few days I could tell it dried my skin out more than I liked. So I haven't done it again since! ...and probably don't plan to do it again anytime soon...unless I feel like my skin needs it. I will also probably only use a pinch of baking soda to 1 teaspoon of coconut oil, so it's less abrasive on my skin.

I also thought I would use apple cider vinegar (mixed with water or witch hazel) as a toner a few times a week... but, I haven't even used it once, because I haven't felt the need to use a toner! Before using coconut oil as face wash, I would feel like I needed to freshen up my skin, since it tended to get oily throughout the day... but since using coconut oil, I haven't had that problem, not even once!

I have been SO happy using just the coconut oil on my face! 
It's only been 1 week, so we'll see how it continues, but so far, I love it!

I'll keep you posted!

P.S...upcoming blog posts:
Health(ier) Banana bread
EASY Chicken Cordon Bleu Bake


My All Natural Face Wash Challenge


*check out my UPDATED all natural face wash post here*

Well, I decided it's time to finally give this idea a go!
For the past couple years I've been using all organic face washes, moisturizers and numerous serums...but unfortunately, even with organic products, you still have unwanted chemicals and fragrances hidden within them.
My skin is pretty sensitive, and it breaks out super easy.
It doesn't help that I have to suffer through harsh Wisconsin winters... (every winter I question why I live here...) that always end up leaving my skin dry and sometimes flaky. 

I've heard numerous people talk rave about their results with using coconut oil on their faces. In fact, I have yet to hear from one person who tried it, and wasn't happy with their results.

Seeing as how I love all things natural, I'm not sure why I've been putting this on the back burner!
We're also starting to talk about baby #2, so seeing as how a pregnancy may be in my somewhat near future, I try to kick as many chemicals to the curb as possible! 
The past few days I've been using coconut oil to moisturize my face, and I've even used it to wash my face a couple times.
So I figured why not give an all natural skin care regimen a try!
Plus, it doesn't hurt that I have ALL these products on hand, most of them right in my kitchen!

So I decided to share my regimen and results (good or bad) with you throughout this process! 
But here's my overall plan:

To wash with coconut oil I use about 1 teaspoon of coconut oil, warm/melt it by rubbing it in my hands, and then just like I would with any other face wash, rub it on my face for a minute or so (ps, it's awesome for removing makeup and mascara especially!). I get a washcloth wet with nice warm water and use that to gently rub it in a little bit more, and to also help remove some of the oil before drying my face off. After using the washcloth most of the oil is removed, so after I dry my face I use just a tiny dab more coconut oil to moisturize my face.


The only thing that's different with the night time routine compared to the morning routine is moisturizing with lavender and tea tree oil mixed in with my coconut oil. I might not do this every night, but most nights I like to give my skin a little something extra. I choose to only add 1 drop of each into about a 1/2 teaspoon amount of coconut oil, and gently massage this all into my skin. Sometimes if it seems like too much, I just rub any extra into my hands, or any where else I have dry skin.  Disclaimer: I have been using lavender and tea tree essential oils on my skin for years, so I know how my skin reacts to them. For some people, even just having the two drops of essential oils in the coconut oil may be too strong for their skin. I suggest reading into essential oils before you decide to use them!! 


I love me some apple cider vinegar (ACV). The list of benefits from this stuff is crazy awesome, and if you're unaware of the awesomeness within that bottle, I highly suggest researching into it a bit! (I swear by the stuff whenever I feel a slight cold, or flu bug creeping up on me... 2 tablespoons ACV in a small glass of cold water morning and night, and the next day whatever was trying to invade my immune system... GONE! No joke, it has worked for me so far every time I've tried it...I will admit, the taste is not the greatest...). I have never tried using ACV as a toner, but again it's one of those things that the people who do use it, swear by it... so why not give it a try right?! I plan to use a 1:1 ratio, equal parts ACV to water or my all natural witch hazel as a toner, and probably use this 3-4 times per week.

I also plan to use coconut oil and baking soda mixed together as more of a deep clean cleanser, as well as a face mask a few times a week. For my sensitive skin I plan to use 1 teaspoon coconut oil and 1/2 teaspoon baking soda, mix it together and apply it to my face just with my hands for a more gentle approach. For a bit of a deeper conditioning treatment, I plan to let this sit on my skin for a couple minutes, before rinsing it off with warm water! Again,  I only plan to do this a few times a week.

So if all of this natural skin care interests you, I suggest reading into it, educating yourself on the different options, and giving it a shot! 
I'm super excited to give it a try and can't wait to share my results with you! 
(fingers crossed they're all good results!!)

Hope you have a fantastic rest of your weekend!!!

Our DIY Bath Salts!

Homemade/DIY Bath Salts


Our Base Recipe:

1 cup Epsom salt
1/4 cup baking soda
1/4 cup sea salt

Our Blends:

lavender + bergamot

eucalyptus + peppermint

lavender + rosewater


lemon + rosemary

This is a super inexpensive DIY project (minus the initial investment on the oils) and makes for a fun little "girls morning" craft!
We bought the Epsom salt, sea salt and baking soda from a local bulk store for roughly $1/pound (some items less, some items slightly more).
The essential oils we bought from a local All Natural store - prices vary depending on what brand you use. Just like anything else in life- the higher the price...the higher the quality.
These oils last forever a VERY long time...a little goes a long way.

As to HOW we did it...
In large glass bowls we mixed up our Epsom salt, sea salt, and baking soda. Then we added our essential oils- we had a total of about 20-30 drops per single batch.

When mixing the oils in the salt mixture, we made sure to grind up any clumps caused from adding the essential oils. Then we dumped and spread the salts out onto a large cookie sheet to dry (this prevents any large clumps) for about 20 minutes.

Then it was time to fill up our containers...
and voila!
It's that easy.

My plan is to not just use these in the bath, but also when I shower, by sprinkling some on the floor of the shower!
This was a super fun and easy little project that even my 10 year old niece helped out with!
(we did feel a little "Walter White/Breaking Bad" while mixing up our salt concoction and dumping it out to dry...we debated adding curry powder and blue food coloring...maybe next time) ;)
(I hope you've seen Breaking Bad, otherwise now you just think I'm crazy...)

Our Kitchen Transformation- HOW I DID IT in 1 weekend!


I will have another kitchen cupboard post, with mostly just photos, once I have the final touches done. For now... these are the photos I will be using... there will still be some blue tape here and there :)

I have dreamt of painting my kitchen cupboards white since we moved in (over 2 years ago).
But the task seemed too daunting, we also weren't sure we wanted to paint over hickory wood- since some people love it (us, not so much). As we updated the rest of our house, we finally came to the conclusion that the hickory cabinets no longer fit the look of our house (not that they ever really did...). They were out of place, and to be honest, driving me crazy.
My husband finally gave me the A-ok to go for it! He was going out of town for a weekend, and taking our 1 year old son, so I would have a full weekend of uninterrupted time to try and get all of this crazy work done!! ...and somehow I managed to do it all in that amount of time! (well, a couple final touches left...but for the most part, I'm done!)

I have to be honest and warn you- this is a HUGE project!
If it wasn't for my husband and son being out of the house for the entire weekend, there was NO way I could have done this in the time frame I was able to! I started taking apart our kitchen on Friday about 1pm, and finished screwing on the last door knob at about 3:30pm on Sunday. I more or less spent every waking minute working on this project.

ANYWAY...

 I wanted to go with a high quality paint, since it will have to hold up to scrubbing, high traffic, and a 1 year old banging and clanging around my kitchen cabinets (not to mention a husband who pretty much does the same thing...).
I bought my primer, paint, and most of my supplies from Sherwin Williams. They were having a 30% off sale (bonus!!).
I highly recommend watching and waiting for their sales! They have sales often, and I have never had to buy paint from them for full price! I also have to say they have the most helpful representatives, they always seem to be quite knowledgeable about the different paints you should use, what tools...etc.
For a project like this, I opted to spend slightly more money, for the highest quality result.
The worker at the store said that using the ProClassic white paint for the cupboards, I would not need a primer if I was going to sand down the cupboards (which I was). He said all I would need is 2 coats of the paint. I opted to still go with the primer. I always use a primer, and wanted to in this case as well. He said if I wanted to use the primer, I would only need 1 coat of primer and 1 coat of paint. 

Here are the specifics of what I used

& exactly how I accomplished this mighty task.


SUPPLIES I USED 

Paint
Type/Color: ProClassic interior acrylic latex, in "Extra White" 
with a semi-gloss finish (they're stock (un-tinted) white color)
Amount: 1 gallon

*This is a self-leveling paint, which means it should dry without any brush or roller marks*
It's the type of paint they recommended for kitchen cupboards.


Primer
Multi-purpose latex primer
Amount: 1 gallon


Other Supplies
I almost always use the tinfoil trick in the roller
tray... that way you're not washing out, or using
numerous trays! Just toss out the used tinfoil!

Ultraflex sandpaper 220 grit(4 pack) -Sherwin Williams
FlockFoam Roller Pad (2 pack) and handle -Sherwin Williams
Mini-Roller Tray -Sherwin Williams
Wagner Flexio 570 Spray Painter
Electric Hand Sander
Painter's Tape
Regular Paint Brush
Tack Cloth


HOW I DID IT ALL

Well, as I said earlier... this was a huge project. I'm going to try and be as specific as possible, and yet keep this as short and to the point as possible!
I'll do my best to try and give you a timeline to all this madness- so you have an idea how long everything took, for your own planning.
So here we go...

I started by taking off the doors, and labeling all of the doors and frames with the corresponding numbers.
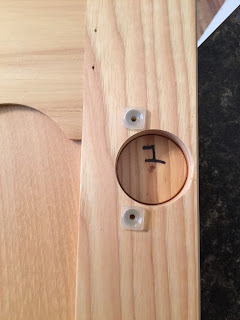
This is the inside of one of my cupboard doors...
I put a piece of masking tape over this number,
since I knew when I painted these, the paint would cover
the number. That way, when I was done painting, I pulled
off the piece of tape, and could see the number ;)


Labeling the frames with the corresponding door numbers just made it that much easier when we put it all back together! TAKE THE TIME TO DO THIS!!! Trust me, I promise it will help. The more organized you are in this project, the less chaotic it all is!

I also put all of the hardware and screws for
EACH cupboard door or drawer, in it's own
bag labeled with the corresponding number.
Did I say how helpful it was to do this in an organized fashion???
SO HELPFUL!!!!!

Once I had all of the doors off, everything labeled and tucked away, I cleaned the frames to get rid of all of the grime that somehow accumulates EVERYWHERE in a kitchen.
 Once everything was clean, I started hand sanding the frames. I used 220 grit sand paper and just sanded the surface until it was dull.
PS- this is MESSY!! You will have dust EVERYWHERE!! Since I left everything in my drawers and cupboards- I covered it all with towels, cloths...etc. When I was done sanding, I used a vacuum to clean all of the sanded surfaces, and all of the dust that accumulated ALL OVER MY KITCHEN! I also went over the sanded surfaces with a tack cloth before priming. YOU DO NOT WANT sanding dust in your new paint!

Once I had the frames sanded, and CLEANED, I used my handy dandy painters taped and taped everywhere I DID NOT want paint (counters, walls, microwave, stove...etc.)

Then I started priming! Using a brush and my flock foam roller I rolled the outside of the frames. I used the roller everywhere I possibly could- in the hard to reach areas (corners, tops of frames, sides of frames, around hinges...etc)  I used the brush.

It took me about 1 hour to do all of the frames. By the time I finished, the area I had first started in was dry enough for a second coat of primer- which I opted to do, even though the guy at Sherwin Williams said I would only need 1 coat of primer...

The flock foam roller is a MUST in my opinion. The picture below is after the 2 coats of primer. I couldn't get over how awesome it looked! It looked like it had been professionally sprayed on!! See for yourself!
Like, WOW!!!
Once I was done with the 2nd coat of primer- it was time to get to work on the cupboard doors!

I cleaned my doors using Honest Company's multi surface cleaner. I opted to use this because this stuff works AMAZING at cleaning off gunk! The toughest, goopiest crap comes off so easy with this cleaner! I really just used this because it's what I had on hand, and I knew it worked good! A few sprays per door, scrub with some paper towel... that's all it took.
And please, don't skip this step! If you leave any gunk on your cabinet doors... it is BOUND to seep through your paint when all is said and done. Take the time to clean them!

Then comes the dreaded sanding.
I say this because it TOOK FOREVER! Basically, I had to sand my cupboard doors down until they were dull. Which resulted in one very sore right arm, and very dirty, dusty clothes. Wear a mask and eye protection...I did this out in the garage. I used my hand sander, which helped, but man was my arm sore!!! I always underestimate how much work sanding is!
(Reminder- I started this whole project Friday at about 1pm. Once I was done sanding the cupboard doors it was about 9:30pm Friday night...I only took about a 1-1/2 hour break for dinner...so plan accordingly. The prep work always takes longer than you expect it to)

Saturday morning about 9:00am, I got back to work.
I vacuumed all of the cupboard doors, and wiped them with a tack cloth.
Then it was time to set up the garage for painting!! (FINALLY!!)
I used a large blue tarp to protect the floor, a couple pieces of old insulation/styrofoam more or less just for added paint protection. Then I set all of the doors/drawers on 1x2s.
SEE BELOW.


With a sprayer- there is ALWAYS some amount of overspray. Make sure everything you don't want paint on, is either OUT OF THE ROOM, or covered. Again- prep always takes the longest, and seems to be the most work!

Then I used my sprayer, and painted the first coat of primer on the BACKS of the cupboard doors.
I let them dry for about 1-2 hours, and they were dry enough for me to flip and start on the other side.
I did the same- 1 sprayed coat of primer on the FRONTS of the cupboard doors.
1 coat of primer on the BACKS of the doors first. Notice my few
practice sprays on the cardboard box BEFORE spraying
on my doors! That's where I make sure all of my settings
are how I want them.

While the fronts dried, I went back to work on the kitchen cupboard FRAMES.
I did the 1 coat of white paint, using the exact same techniques for painting as I did with the primer.

Now it was about 5pm on Saturday. DINNER TIME! 

After a longer dinner break over at my sister's house (which was so amazing, because I never get to slowly enjoy dinners with family anymore, thanks to my 1 year old son...) I got back to work about 8:00pm. My frames were donezo!!! 2 coats of primer, and 1 coat of paint was all it took!

So I got to work on the cupboard doors/drawers. Both sides were now primed, and ready for paint! Using the white paint, I sprayed the FRONTS of the cupboard doors, and let them dry all night.

8:00am Sunday morning
I flipped the doors/drawers over and sprayed the BACKS of the doors with the white paint.

According to the can, it takes 1 hour to dry to the touch, and 4 hours to dry between coats.

After doing the 1 coat of white paint on both sides- I checked them over to see if they needed a 2nd coat of white- and they DID NOT! They were perfect! (Mr. Sherwin Williams man was right!)

I let them dry & cure for about 5 hours before bringing them inside. I was prepared to let them sit for a few days to really harden and cure - but the more I checked them, I really thought they were good enough to be brought back in!

So, with my dad's help (because it's a 2 person job...) we put all of the doors and drawers back on!

I also bought new cupboard and drawer hardware! I bought knobs for the doors, and cup pulls for the drawers, both in oil rubbed bronze off of Amazon.
If you're interested in the hardware I used, click the links below to see exactly what I bought for both:
Knobs
Cup Pulls
PS - these were FAR cheaper on Amazon than I could find them in any other store.

Once we had all of the doors/drawers and new hardware on... we were DONE!!!
This was about 3:30pm on Sunday.
So it was A LOT of work in a short amount of time.
BUT SO WORTH IT!!

Check out the BEFORE and AFTER pictures:

I literally COULD NOT be happier with how the cupboards all turned out! Everything that was rolled looks amazing and has a professional, factory finish! The sprayed doors and drawers also look flawless! See for yourself below!


ONE LAST little thing I did, since I put the cupboards up without giving them days to cure, I put vaseline on all of the rubber stops that were on all of the insides of my doors and drawers. This prevents the paint from sticking and peeling off at all!!! We also have slow-close plungers on all of our cupboard doors, and some of our drawers, these also got the vaseline trick! 
Just enough vaseline to cover them, to prevent any sticking!

VOILA!

As I said before...
In my final Kitchen Remodel post I will have more, truly FINISHED photos!
(minus the blue tape!)

Hopefully this helps some of you who are interested in painting your own cupboards!!
 It's a big project- but it's the cheapest way to TOTALLY TRANSFORM your kitchen!


Post Signature

Post Signature