Slide Show

My Favorite Spinach Smoothie


This smoothie is HANDS DOWN, the best smoothie I have ever had!
It's the easiest way to sneak 2 cups worth of greens into my diet... not to mention, into GAVIN'S diet! SCORE!

So, here's how it's done: 


The other nice thing about this smoothie, is you can swap out the fruits. I've tried it with pineapple instead of mango... you can also use kale instead of spinach!
It allows for all kinds of variety, which is always fun.

Try it out...
ENJOY!

Breast Milk Queen

This is my deep freeze, full of nothing but breast milk.

If you're like me, and you want a freezer full of breast milk for your baby, keep reading & I'll fill you in on how I did it!

My disclaimer: I am in no way a breast feeding expert. I didn't read any specific breast feeding books before giving birth.  I didn't even take a breast feeding class, BUT, obviously what I did worked, and it was nothing crazy, so I'm hoping it will work for other mamas who want to give it a try!! :) 

So here's a little background....From the day I found out I was pregnant with Gavin I knew I wanted to breast feed him.  Just from what I had heard from other moms, and what I had read about in my baby books, I knew it was what was best for my baby!  My husband is a chiropractor (huge into nutrition), so to be honest, in the beginning he probably knew more about the benefits of breast feeding than I even did!  My advice to any mom who's not sure whether they want to breast feed or not- RESEARCH!!! Read about the benefits of breastfeeding, not only for your baby, but for YOURSELF (hello! easiest way to burn calories post-baby!!)! 
Make your own educated decision, and don't rely on just what everyone else says!

Fast forward a little bit to when Gavin was born! (YAYY!) :)  I expected breast feeding to be a breeze... you always see all the breast feeding pictures where the mom looks so beautiful and relaxed, and it just looks perfect.  SO NOT THE CASE FOR ME...at first anyway! I cursed breast feeding.  A LOT. Sometimes I felt like I couldn't get Gavin to latch on good... IT HURT... My nipples cracked (rewind to my pre-mama days, and if I would have heard a woman say her "nipples cracked", I wouldn't have even known how that is possible..ouch, and ew!?) A few times during the night Gavin would over eat, and spit up... A LOT.... (of course all over my side of the bed because that's where I fed him), so I would automatically curse breast feeding and swear that I was going to just give up! Thank God I knew better, and I stuck with it, because by about the time Gavin was 2 months old, I felt like a breast feeding pro! :)  (Mixing a brand new first time mama, with not very much sleep, and topping that with off the wall hormones... it's no surprise I was so quick to "hate" breast feeding!)  I knew I had to stick with it, because it was best for Gavin...and now my life was all about what's best for HIM!

So now that you know my background with breast feeding, that was initially my motivation for stock piling a crap ton of milk. So I could quit breast feeding as soon as possible... but still give Gavin breast milk until he hits the 1 year mark! 
It's funny now looking back at it (since now I enjoy breast feeding), but at the time I was so desperate to stock up my milk, because I just wanted to be done breastfeeding!! 

So now the whole reason you're reading this post... HOW DID I DO IT?!

I don't have a bunch of secrets.  It's all just stuff I read mostly online, in a couple of my baby books, or in one of my many baby apps I had on my phone. ;)  

So here you go: 
I eat very healthy.  
I drink a lot of water.  
I never stopped taking my prenatals.  
I pumped like a crazy woman (at first).

I'll break each of these up and give you the details on how I did each below!

MY DIET: My husband and I eat extremely healthy about 95% of the time. Organic foods, not very many processed foods, lots of protein, veggies..etc. I really try to stay away from sugar the best that I can.. (that being said I'm a huge sucker for Oreo cookies and must admit- I do give in to my occasional craving for them....!) I really think having a good diet that consists of key ingredients needed to produce breast milk helps a ton..not to mention, more yummy nutrients for your baby! 

WATER: This part is simple, and there's not a whole lot that goes into it besides... DRINK A TON OF WATER!! I was NEVER a big water drinker before being pregnant...and wow, once I learned of all the crazy awesome benefits just from WATER....I was hooked.  I feel so much better staying as hydrated as I do! It helps with my energy levels, I don't feel as hungry throughout the day and I always end up noticing a change in my skin (clearer, brighter..etc.)! So water is truly your best friend! I even got fancy for awhile and would flavor my water with some fresh strawberries, cucumber, or lemon(this definitely helped me start drinking more water in the beginning)! YUMMM!! Currently, I try to drink about 100 oz of water every day.  (I personally, go by the rule of thumb to drink 1/2 your body weight (in ounces) in water. So I weigh about 125lbs, so I should be drinking roughly 60-70 oz of water daily, and I add in an additional 30-40 oz since I'm breastfeeding). I finally purchased a nice big 32 oz water bottle from Target about a week ago, and LOVE it! For whatever reason having a big water bottle helps me drink more water... way easier than having to refill a glass, or a small water bottle all the time! 

PRENATALS: I never stopped taking them.  I still take them every day! Click on the "prenatals" link if you're interested in the ones I use.

PUMPING: Oh boy, here we go. I have a Medela Pump In Style Advanced Pump that was pretty much by my side for the first 2 months.  After Gavin was born, around the time he was about 1 week old I would pump for maybe 5 or so minutes, right after feeding him (only during the day)! I would literally get done feeding him, burp him, lay him down next to me and pump.  I never got much out of it, but I was able to start slowly stock piling it away! :) I pumped right away after feeding him just to get my supply up- there were definitely some feedings that I wouldn't pump after, but for the most part I tried to pump as often as I could.  So after roughly a couple months of that, I already had good stash going so I slowed down on the pumping.  I would pump first thing in the morning (because Gavin was sleeping through the night at 6 weeks..my boobs were sooo full in the morning I would just pump, and Aaron would give Gavin a bottle) and I would also pump at night- right before bed.  I would breastfeed Gavin for the last time at night around 8 or 9, lay him down and then pump before I went to bed (again I wouldn't get much from it, but I'd stash away whatever I got, and it would help keep my supply up!)  When Gavin was about 4 months old, I went down to just pumping in the mornings! Why? Honestly, I just got sick of pumping at night! I had plenty of milk stocked up that I didn't really have a need to pump at night anymore! Fast forward- Gavin is 5 months old, and I only pump one time, first thing in the morning.  (I have always gotten consistently between 20-22oz every time I pump in the morning).  My morning supply hasn't changed at all- I still get the same amount every time.  Every morning I get to stash away about 4 or 5 bottles!! (Your supply is usually highest in the mornings...so if you want to try to get as much as possible, try pumping in the morning)

This is how much I pump in one sitting (15 minutes), first thing every morning.
Another big tip I have for pumping- I NEVER miss a feeding (ok, maybe I've missed one?..but literally, that's it).  If Gavin is going to be getting a bottle- I'm pumping! It's not often that I'm away from him for a feeding- but if I know I will be, I take my pump and I don't miss it.  I think it's important, because as soon as you start skipping feedings- your body doesn't know that the baby is getting a bottle..your body thinks "baby's not as hungry, and doesn't need as much food" and your supply starts to decrease! Don't let that happen, until you're ready for it to happen! It's easier to keep your supply up, than to have to try and get your body back to producing more! 
(If you do need to increase your supply...make sure you're drinking enough water, and pump more often! It essentially signals to your body "this baby is hungry, we need to produce more food!"..give it a few days and you should see an increase)

*Like I said earlier- I am in no way a breast feeding expert.. I just did my research, and educated myself on the topic.  What I did, worked FANTASTIC... for ME! Everyone's different, but I believe if you put in the effort and the time, (and stick with it!!!!) you'll be filling freezers just like I am!*

December Life


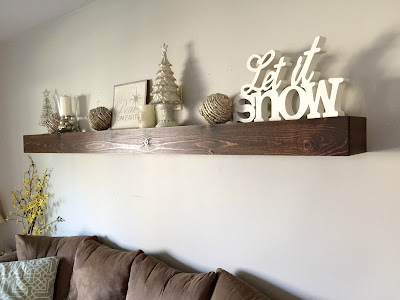
Not gonna lie... Christmas decor went up early this year... How could I possibly wait until AFTER Thanksgiving when I had this gorgeous, new Floating Shelf to decorate...

A beautifully, and perfectly balanced ornament, placed by
yours truly... Gavin.
Being that this is our first Christmas with a mobile, destructive (in a loving way) 1 year old, I have been lucky enough to re-decorate the bottom 1/3 of our Christmas tree every night after Gavin is in bed. He loves to pull off the ornaments and play with them, and of course throw them around, which is why it's a bonus to have cheap, plastic ornaments! ;) 
I guess buying Target's cheap box of ornaments worked out for me in the long run....

It's December 16th, and so far we have only had a dusting of snow. Which is CRAZINESS for us here in Wisconsin. There were people out golfing a couple days ago... that just isn't supposed to happen at this time, in this state! (but hey! I'll take it!)

Other than the every day madness, that we now know as "life"...
we have really just been enjoying a slower paced December.

I have put off finishing our kitchen project... (the tiny bit of white paint that still needs to be finished). After a marathon project like that, I notice I tend to take my time with completing all of the "finishing touches". With Thanksgiving, birthdays, Christmas, and a 1 year old on top of it all... I figure I can focus my energy somewhere else in the mean time. ;) It will all get finished... eventually.

I hope you are having a December full wonderful craziness, just like we are!
I will continue to spend my days wishing for a beautiful Wisconsin blizzard so we can have a dreamy, White Christmas, wrapping presents, and sipping my coffee while listening to Christmas music!!

....Oh, and I'll also be spending the majority of my time chasing after Gavin, changing diapers, picking up dog food (that Gavin has spilled...and tried to eat), and repeating all of that, more or less, my entire day.
Would I have it any other way???
NOPE!
I couldn't have you thinking my life was all Christmas cheer, blissful perfection... yuck!
;)

Merry Christmas & Happy New Year!


Our Kitchen Transformation- HOW I DID IT in 1 weekend!


I will have another kitchen cupboard post, with mostly just photos, once I have the final touches done. For now... these are the photos I will be using... there will still be some blue tape here and there :)

I have dreamt of painting my kitchen cupboards white since we moved in (over 2 years ago).
But the task seemed too daunting, we also weren't sure we wanted to paint over hickory wood- since some people love it (us, not so much). As we updated the rest of our house, we finally came to the conclusion that the hickory cabinets no longer fit the look of our house (not that they ever really did...). They were out of place, and to be honest, driving me crazy.
My husband finally gave me the A-ok to go for it! He was going out of town for a weekend, and taking our 1 year old son, so I would have a full weekend of uninterrupted time to try and get all of this crazy work done!! ...and somehow I managed to do it all in that amount of time! (well, a couple final touches left...but for the most part, I'm done!)

I have to be honest and warn you- this is a HUGE project!
If it wasn't for my husband and son being out of the house for the entire weekend, there was NO way I could have done this in the time frame I was able to! I started taking apart our kitchen on Friday about 1pm, and finished screwing on the last door knob at about 3:30pm on Sunday. I more or less spent every waking minute working on this project.

ANYWAY...

 I wanted to go with a high quality paint, since it will have to hold up to scrubbing, high traffic, and a 1 year old banging and clanging around my kitchen cabinets (not to mention a husband who pretty much does the same thing...).
I bought my primer, paint, and most of my supplies from Sherwin Williams. They were having a 30% off sale (bonus!!).
I highly recommend watching and waiting for their sales! They have sales often, and I have never had to buy paint from them for full price! I also have to say they have the most helpful representatives, they always seem to be quite knowledgeable about the different paints you should use, what tools...etc.
For a project like this, I opted to spend slightly more money, for the highest quality result.
The worker at the store said that using the ProClassic white paint for the cupboards, I would not need a primer if I was going to sand down the cupboards (which I was). He said all I would need is 2 coats of the paint. I opted to still go with the primer. I always use a primer, and wanted to in this case as well. He said if I wanted to use the primer, I would only need 1 coat of primer and 1 coat of paint. 

Here are the specifics of what I used

& exactly how I accomplished this mighty task.


SUPPLIES I USED 

Paint
Type/Color: ProClassic interior acrylic latex, in "Extra White" 
with a semi-gloss finish (they're stock (un-tinted) white color)
Amount: 1 gallon

*This is a self-leveling paint, which means it should dry without any brush or roller marks*
It's the type of paint they recommended for kitchen cupboards.


Primer
Multi-purpose latex primer
Amount: 1 gallon


Other Supplies
I almost always use the tinfoil trick in the roller
tray... that way you're not washing out, or using
numerous trays! Just toss out the used tinfoil!

Ultraflex sandpaper 220 grit(4 pack) -Sherwin Williams
FlockFoam Roller Pad (2 pack) and handle -Sherwin Williams
Mini-Roller Tray -Sherwin Williams
Wagner Flexio 570 Spray Painter
Electric Hand Sander
Painter's Tape
Regular Paint Brush
Tack Cloth


HOW I DID IT ALL

Well, as I said earlier... this was a huge project. I'm going to try and be as specific as possible, and yet keep this as short and to the point as possible!
I'll do my best to try and give you a timeline to all this madness- so you have an idea how long everything took, for your own planning.
So here we go...

I started by taking off the doors, and labeling all of the doors and frames with the corresponding numbers.
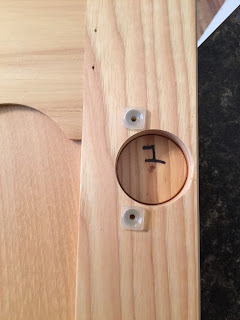
This is the inside of one of my cupboard doors...
I put a piece of masking tape over this number,
since I knew when I painted these, the paint would cover
the number. That way, when I was done painting, I pulled
off the piece of tape, and could see the number ;)


Labeling the frames with the corresponding door numbers just made it that much easier when we put it all back together! TAKE THE TIME TO DO THIS!!! Trust me, I promise it will help. The more organized you are in this project, the less chaotic it all is!

I also put all of the hardware and screws for
EACH cupboard door or drawer, in it's own
bag labeled with the corresponding number.
Did I say how helpful it was to do this in an organized fashion???
SO HELPFUL!!!!!

Once I had all of the doors off, everything labeled and tucked away, I cleaned the frames to get rid of all of the grime that somehow accumulates EVERYWHERE in a kitchen.
 Once everything was clean, I started hand sanding the frames. I used 220 grit sand paper and just sanded the surface until it was dull.
PS- this is MESSY!! You will have dust EVERYWHERE!! Since I left everything in my drawers and cupboards- I covered it all with towels, cloths...etc. When I was done sanding, I used a vacuum to clean all of the sanded surfaces, and all of the dust that accumulated ALL OVER MY KITCHEN! I also went over the sanded surfaces with a tack cloth before priming. YOU DO NOT WANT sanding dust in your new paint!

Once I had the frames sanded, and CLEANED, I used my handy dandy painters taped and taped everywhere I DID NOT want paint (counters, walls, microwave, stove...etc.)

Then I started priming! Using a brush and my flock foam roller I rolled the outside of the frames. I used the roller everywhere I possibly could- in the hard to reach areas (corners, tops of frames, sides of frames, around hinges...etc)  I used the brush.

It took me about 1 hour to do all of the frames. By the time I finished, the area I had first started in was dry enough for a second coat of primer- which I opted to do, even though the guy at Sherwin Williams said I would only need 1 coat of primer...

The flock foam roller is a MUST in my opinion. The picture below is after the 2 coats of primer. I couldn't get over how awesome it looked! It looked like it had been professionally sprayed on!! See for yourself!
Like, WOW!!!
Once I was done with the 2nd coat of primer- it was time to get to work on the cupboard doors!

I cleaned my doors using Honest Company's multi surface cleaner. I opted to use this because this stuff works AMAZING at cleaning off gunk! The toughest, goopiest crap comes off so easy with this cleaner! I really just used this because it's what I had on hand, and I knew it worked good! A few sprays per door, scrub with some paper towel... that's all it took.
And please, don't skip this step! If you leave any gunk on your cabinet doors... it is BOUND to seep through your paint when all is said and done. Take the time to clean them!

Then comes the dreaded sanding.
I say this because it TOOK FOREVER! Basically, I had to sand my cupboard doors down until they were dull. Which resulted in one very sore right arm, and very dirty, dusty clothes. Wear a mask and eye protection...I did this out in the garage. I used my hand sander, which helped, but man was my arm sore!!! I always underestimate how much work sanding is!
(Reminder- I started this whole project Friday at about 1pm. Once I was done sanding the cupboard doors it was about 9:30pm Friday night...I only took about a 1-1/2 hour break for dinner...so plan accordingly. The prep work always takes longer than you expect it to)

Saturday morning about 9:00am, I got back to work.
I vacuumed all of the cupboard doors, and wiped them with a tack cloth.
Then it was time to set up the garage for painting!! (FINALLY!!)
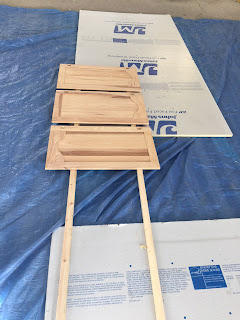
I used a large blue tarp to protect the floor, a couple pieces of old insulation/styrofoam more or less just for added paint protection. Then I set all of the doors/drawers on 1x2s.
SEE BELOW.


With a sprayer- there is ALWAYS some amount of overspray. Make sure everything you don't want paint on, is either OUT OF THE ROOM, or covered. Again- prep always takes the longest, and seems to be the most work!

Then I used my sprayer, and painted the first coat of primer on the BACKS of the cupboard doors.
I let them dry for about 1-2 hours, and they were dry enough for me to flip and start on the other side.
I did the same- 1 sprayed coat of primer on the FRONTS of the cupboard doors.
1 coat of primer on the BACKS of the doors first. Notice my few
practice sprays on the cardboard box BEFORE spraying
on my doors! That's where I make sure all of my settings
are how I want them.

While the fronts dried, I went back to work on the kitchen cupboard FRAMES.
I did the 1 coat of white paint, using the exact same techniques for painting as I did with the primer.

Now it was about 5pm on Saturday. DINNER TIME! 

After a longer dinner break over at my sister's house (which was so amazing, because I never get to slowly enjoy dinners with family anymore, thanks to my 1 year old son...) I got back to work about 8:00pm. My frames were donezo!!! 2 coats of primer, and 1 coat of paint was all it took!

So I got to work on the cupboard doors/drawers. Both sides were now primed, and ready for paint! Using the white paint, I sprayed the FRONTS of the cupboard doors, and let them dry all night.

8:00am Sunday morning
I flipped the doors/drawers over and sprayed the BACKS of the doors with the white paint.

According to the can, it takes 1 hour to dry to the touch, and 4 hours to dry between coats.

After doing the 1 coat of white paint on both sides- I checked them over to see if they needed a 2nd coat of white- and they DID NOT! They were perfect! (Mr. Sherwin Williams man was right!)

I let them dry & cure for about 5 hours before bringing them inside. I was prepared to let them sit for a few days to really harden and cure - but the more I checked them, I really thought they were good enough to be brought back in!

So, with my dad's help (because it's a 2 person job...) we put all of the doors and drawers back on!

I also bought new cupboard and drawer hardware! I bought knobs for the doors, and cup pulls for the drawers, both in oil rubbed bronze off of Amazon.
If you're interested in the hardware I used, click the links below to see exactly what I bought for both:
Knobs
Cup Pulls
PS - these were FAR cheaper on Amazon than I could find them in any other store.

Once we had all of the doors/drawers and new hardware on... we were DONE!!!
This was about 3:30pm on Sunday.
So it was A LOT of work in a short amount of time.
BUT SO WORTH IT!!

Check out the BEFORE and AFTER pictures:

I literally COULD NOT be happier with how the cupboards all turned out! Everything that was rolled looks amazing and has a professional, factory finish! The sprayed doors and drawers also look flawless! See for yourself below!


ONE LAST little thing I did, since I put the cupboards up without giving them days to cure, I put vaseline on all of the rubber stops that were on all of the insides of my doors and drawers. This prevents the paint from sticking and peeling off at all!!! We also have slow-close plungers on all of our cupboard doors, and some of our drawers, these also got the vaseline trick! 
Just enough vaseline to cover them, to prevent any sticking!

VOILA!

As I said before...
In my final Kitchen Remodel post I will have more, truly FINISHED photos!
(minus the blue tape!)

Hopefully this helps some of you who are interested in painting your own cupboards!!
 It's a big project- but it's the cheapest way to TOTALLY TRANSFORM your kitchen!


DIY Floating Shelf (in *3* easy steps!)


DIY floating shelf in 3 easy steps

Well what do you know, 
I have another cheap, easy and beautiful DIY project to share with you!

Our living room wall was driving me nuts. I couldn't find anything I liked for that wall. . .
UNTIL NOW!!!

The floating shelf is absolutely amazing. 
It's definitely the focal point of the living room, and it's a perfect spot to showcase seasonal decor!!

This project took about 1/2 a day. That includes ripping the boards, assembling everything, staining and bringing it inside to hang! It was so much easier than I expected.

I'll explain how we assembled ours, the exact measurements we used, and the stain color.

So if you're interested, 
in 3 simple steps, here you go:

First, here are the supplies you'll need:

Drill
2 1/2" deck screws
3 1/2" wood screws
1 1/2" hardwood trim nails
(3) 1x8x8 pine boards for "box"
2x4's for "support"
Stain & poly finish if you choose
Level (if you want a straight shelf...)
Stud-finder


STEP 1: Assemble & attach your "support"

We used 2x4s for our inner support frame.
I wanted the shelf to be the entire length of our couch, so we made our inner support 86-1/2" long.
We used 6 supports (aka, "stubs"), each being 5-3/4".
(PREDRILL the holes in your main 2x4, to which you'll attach your stubs)
Then, using 2-1/2 inch deck screws, we attached the stubs to the main 2x4 piece.
Once our support frame was done, we used a stud-finder to locate all of the studs we could use to drill our frame to. We made a small mark on the wall where each stud was located.
Then, we used a level to get our frame in place, and using 3-1/2" wood screws, we attached our frame to the wall. We used 2 screws for each stud.


STEP 2: Assemble The "Box"

We chose to use 1-1/2" hardwood trim nails and a hammer to assemble the box.
You could use a nail gun or screws, but for us this was easiest, and we knew (from previous projects) that the nails would not show with the color of stain we would be using.
As you can see in the picture below, our top and bottom boards were both 86-1/2"x7-1/4".
Our end pieces were both 7-1/4"x5".

Last, we attached the front face board, which was 88"x5".

Depending on the look you're going for, or what wood you use, you may be ready to assemble your shelf at this point! I chose to stain mine a nice, dark walnut color. I used Rustoleum's Dark Walnut stain. I applied it with a brush, let it sit for 2-3 minutes, then wiped away the excess stain with an old cut up t-shirt.

Once Aaron was done helping me assemble the box, he worked
on his Katniss skills while I worked on the staining.


STEP 3: Hang Your Beautiful Shelf!

As you have probably guessed, this was the easiest step!
Once your box is dry, and poly-ed (if you choose to...which I did) take your box and slide it onto your support!
Using screws, attach the box to the support through the top board (that way your screws should be hidden).

VOILA!


Again... Harley the photobomber.


November '15

Nope.
I can't even.
There's no possible way, it is already NOVEMBER of 2015.
I'm still confused as to where 2014 went!!!! 
Now we're almost to 2016?
I'm convinced time flies by a million times faster when you have a baby... who I guess is now already considered a "toddler". CASE IN POINT. Time is obviously flying by far too fast for my liking.

November for this family means...

 1. A cozy night in, with some crockpot stroganoff


2. Pumpkins on the front porch for as long as possible!!! LONG LIVE OUR BEAUTIFUL PUMPKINS!

3. THE VOICE. We aren't big tv show people... I used to be, but my days of mindless television for hours on end seemed to come to a screeching halt once I had a baby that stole all my time! :) 
He's worth it.  ;)

4. ALMOST a new season of Fixer Upper!!!!! Hallelujah, because I can't continue watching the same repeats of this show a hundred times... yet I find myself doing just that. 

5. Sweaters and boots!! YES!! My favorite... although I think when summer rolls around I probably claim "maxi dresses and sandals are my favorite!!"...eh, whatev... that's what happens when you live in Wisconsin.

6. HOLIDAYS! Thanksgiving is the beginning of the holiday season in our family. Once Thanksgiving's over, it's all about Christmas in this house baby! That means Christmas decor, some Frank Sinatra Christmas Collection music on repeat, and all things peppermint, hot chocolate, and balsam candles!
I need to slow myself down... and remind myself it's only November 3rd.
I get a little antsy for Christmas... if you can't tell.

7. DATE NIGHTS! Yup that's right. Not that date night's aren't important during any other month, but just recently my sister-in-law and I have decided to "swap" babysitting each month. Meaning, instead of paying a babysitter for each of us to get out for a date night with our hubby's once a month, we decided to watch each other's kids instead.. fo' free! (sorry, had to use the fo' free phrase there...couldn't resist). 
I highly recommend this!! We both love being able to spend the time with each other's kids, and it somehow holds us accountable to each other to make sure we are getting out, and spending time with our husbands! 
I feel like in the hustle and bustle of every day life, a date night gets pushed aside. But, it really is important to still take some time to yourself, get out and be KID-FREE for a few hours! 

8. Football. Go Pack Go! It's not fall without football... and in our house football means good food, a cold beer, and a comfy couch!

Hope your November is as cozy and warm as ours will be! 
:)

CrockPot Stroganoff


Maybe it's just me, but there's something about Fall... and crockpot dinners.
I have somehow developed a new obsession with crockpot meals over the past couple weeks.
The ease of throwing everything into a crockpot in the morning, and not having to do a thing to it all day, but having a delicious dinner ready for you come 6pm... is a beautiful thing. Especially when you are busy chasing around a 1 year old all day.

I was craving stroganoff- a warm, cozy meal for a November night.
So after looking at a couple recipes as a guide- I decided to go at my own little recipe.
I used a couple different recipes as a base- and used whatever ingredients I had on hand!
And voila- this amazing crockpot recipe was born!!
I have to share it, because my husband rated it a 9 out of 10 (I asked him what was a 10...and he didn't know....) and because it is such a simple, delicious fall recipe!!! 
I also tried to make it as healthy as possible...as healthy as a stroganoff can be...
I definitely think it tastes lighter, not quite as heavy, as most other traditional stroganoff recipes!

Anyways...

Here It Is:

Ingredients:

(I choose to use all organic ingredients)
1 lb sirloin steak cut into 1 inch cubes
3/4 cup beef broth
1 can cream of mushroom soup (about 12 oz)
1/2 yellow onion diced
2 tablespoons dry white wine
2 tablespoons Worcestershire sauce
2 tablespoons minced garlic
1 teaspoon salt
1/2 teaspoon pepper
16 oz bag egg noodles
1 cup plain greek yogurt
Dried parsley flakes & sour cream *optional*

Instructions:

1.  Add sirloin steak, beef broth, mushroom soup, onion, wine, Worcestershire sauce, garlic, salt and pepper to crockpot and stir together.
Cook on low for 6 hours.
(I cooked mine on low for 3 hours, and then set it down to 'warm' for the remaining 3 hours since our crock pot always seems to cook at a higher temperature)

2. About 20 minutes before your desired "dinner time", cook noodles according to instructions on package. Strain the noodles.

3. Add the cooked noodles, and the 1 cup plain greek yogurt to the crock pot. Mix well.

4. To serve, sprinkle with the dried parsley, and add a dollop of sour cream - if you so desire :)
(Which I always do!!!...stroganoff without sour cream just seems wrong...)


And there you have it!!!
A simple, and delicious recipe for the days you just don't have the time (or energy) to cook a big dinner!

ENJOY!!


DIY Storage/Entertainment Center


This was such a fun project!!

I had this idea in my head of what I wanted for playroom storage and a little entertainment center. After shopping around, looking at cube storage and different shelving ideas... I finally realized I wanted storage that actually HID all of the toys, and could still double as our entertainment center.

Since it's me, and I don't seem to like the 'easy road'... I decided to take my idea- and bring it to life myself!
I was going to have to piece this thing together, and create exactly what I wanted on my own! 
...the challenge, and the creativity behind it, was pretty exciting.

So I knew I wanted to use kitchen upper cupboards, since the size was perfect for what I was looking for. I started by looking around on craigslist and local donation warehouses for old ones I could refinish... no such luck. They had some, but they were pricier than I wanted. 
So my best option was to buy 3 new, double, unfinished oak cupboards from Menards, each being $85.

I used my Wagner Flexio paint sprayer and primed, and painted them white.
(1 coat of primer, 3 coats of white)

Then I started working on the "counter".
I bought 2 unfinished pine boards and stained them using my dark walnut stain.
I did one coat of stain, and then used a water based varnish to seal them.

To get the cupboards in place on the wall I had to remove the baseboard trim from that part of the wall.
Then we made rectangle "bases" out of scrap 2x4's so the cupboards would be lifted up enough to trim them out and give them more of a built-in look.
2x4 rectangle bases

Once we had the bases done, we just set the cupboards on them and got the them all in place on the wall. We screwed them to the wall, then I worked on caulking all of the cracks & seams, while Aaron cut the trim pieces to trim it all out.

Once we had that all in place and trimmed out- it was time to figure out how we would get our pine boards secured on top.
We decided to just use smaller nails and a regular old hammer, and hammered them down in place. The nails are almost impossible to see... you really have to look to try and find them.


And there you have it!
The finished product!

SO MUCH STORAGE!!!! I'm one happy mom!!


The plan is to buy a bigger tv in the near future- but for now this little guy works just fine!
I've done a lot of projects that have been super rewarding, but this one might take the cake!
It was so much fun to take a totally dreamed up idea in my head, and actually bring it to life... and have it turn out EXACTLY how I wanted!

Goes to show- most things you want to do, can be done.
You just need the motivation and creativity to do it!


DIY Scrabble Wall Tiles

DIY Scrabble wall tiles

Usually I drag these "how to" posts on and on... so I'll do my best to keep this short!
It really is a simple project- but it did take awhile (hand painting all of the letters took time, and resulted in a sore neck...)

1. Pick out your words.
I used these tiles in our playroom- so I wanted playroom related words. 
The list of possible options is really endless... especially when you could use different words for different rooms.

2. Get your "tiles".
I used a scrap piece of wood (some sort of pressed, smooth plywood) that I found hiding in a corner out in the back of my Dad's shed. It was a really light colored wood, so I knew I would be staining it. The board was about 12" wide & 72" long. With the help of my wonderful father, we ripped the board down, and sawed away until I had 11 "tiles"- each measuring exactly 6"x6". 
I sanded the tiles down- since it was a scrap piece of wood it needed some TLC before staining.

3. Stain tiles.
Depending on what sort of tiles you have, or what color you want- you may not need to do this step!
I chose to use my dark walnut stain- since our walls in the playroom are lighter, I wanted the tiles to contrast and stand out more. I sealed the stain with one coat of water based varnish.

4. Stencil Letters & Numbers.
There are lots of different ways to go about this step. I chose to cut out the letters with a specific font- using my Mom's "silhouette" cutter. Then, taking the letter cut-outs, I traced them using a fine point sharpie. The black ink hardly showed up on the dark wood, so it worked perfectly for my tiles.
Then it was time to paint.
I used white acrylic paint, and a small craft paint brush and got to work.
I ended up doing 3 coats of white paint for the letters.

DIY scrabble wall tiles

5. Decorate Your Wall!
DIY scrabble wall tiles
I used these command strips to hang them on the wall.
(they're like velcro and worked great!)

DIY scrabble wall tiles
I laid out all of my letters first to see how big I wanted it all to be once said & done.
Once I had it how I wanted, I made sure to measure the distance (which for me was 2 1/2") between each tile. 
Then it was time to get them on the wall!

DIY scrabble wall tiles

VOILA!

THAT much closer to finally having this playroom FINISHED!!!


Same Blog- New Name!


Well-
Things are slightly different around here!
New name- but the same blog!

...now...
I need to get back to my scrabble tile project & check on the crazy sounds coming from our back yard as my husband attempts to put together some bases for our playroom storage/entertainment center!

Enjoy your Friday!!


Apricot Lemon Glazed Chicken


This is a favorite in our house! 
Super easy, healthy, and tastes delicious!!
I LOVE this recipe because it takes under 20 minutes to make!! There's also not a whole lot that goes into preparing it- so it's easy to make this, and at the same time be chasing around my 1 year old :)
You can't say that about many other meals!

What You Need:
(We choose to alway use organic ingredients)

2 chicken breast
1 tsp curry powder
1/2 tsp salt (I use "Real Salt" Sea Salt)
1/4 tsp pepper
2 Tablespoons water
1 Tablespoon lemon juice
1/3 cup apricot spread

What to Do:

1. Combine your curry powder, salt, and pepper in a small dish. Rub over chicken breast.

2. Grill chicken breast on medium-high heat.

3. WHILE the chicken breast is grilling, combine lemon juice, water and apricot spread in a small pan over medium heat. This will be your delicious glaze :) You want it to simmer- so it thickens up. Once it is at a good "sauce" consistency, turn the heat down to low to make sure it doesn't get too thick. This usually only takes about 5-10 minutes.

4. Once the chicken breast is done grilling, we always put it over some leafy greens (spinach, mixed greens...etc.)! Then drizzle the glaze over the chicken and the greens. The combination of the chicken breast, the glaze, and the greens is delicious!

There you go! 
Hope you Enjoy!
:)
We were obviously really craving the "greens" this night- since the additional
side was peas. :)


Post Signature

Post Signature